Residential and Commercial Roofing Done RIGHT!

Replace your Roof with A TRUSTED COLORADO FRONT RANGE ROOFING PROFESSIONAL

Category Archives: Roof Tips & Advice

13 Reasons to Fix or Replace your Gutters

When a well-designed and well-maintained gutter system is installed on a home or business, it should last for decades if they are not damaged in a storm, ice damming or in high winds. That said, there will come a time when even the best maintained gutters will need to be replaced because they have “aged-out” and have reached their life expectancy.

This article will give you a heads up on what to look for when an “out of the norm” situation occurs to your gutters so that you can take care of it as soon as you notice it – so that additional damage does not happen. One of the joys of being a “homeowner.”

Here are 13 reasons you might need to fix or replace your gutter system.

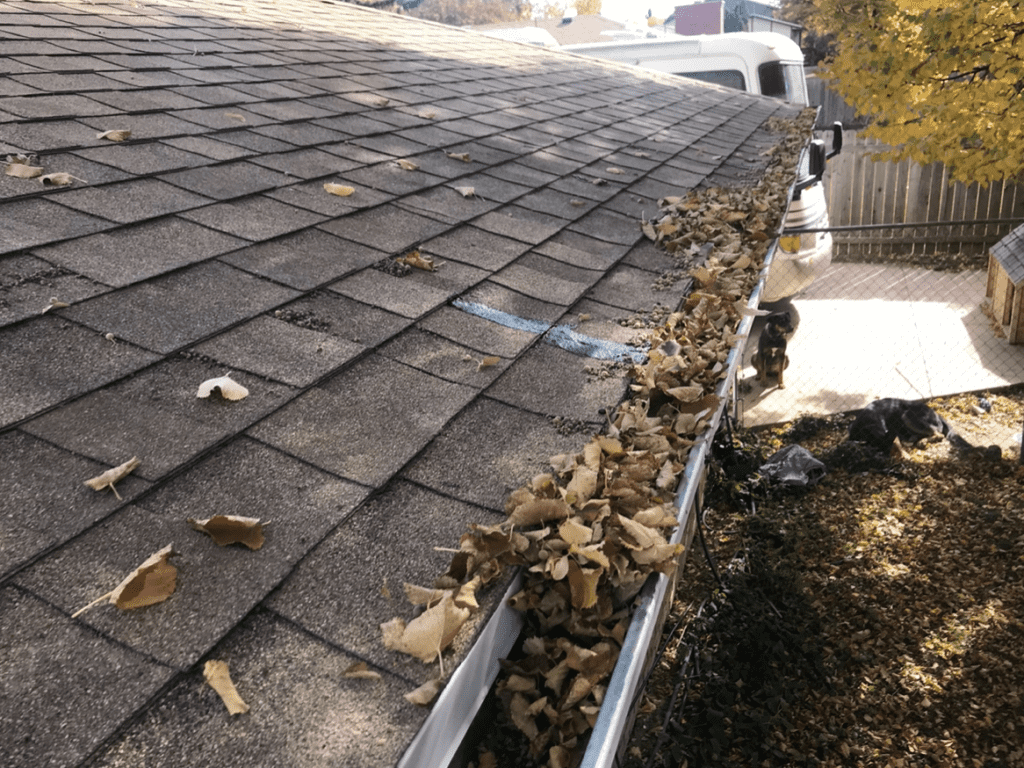
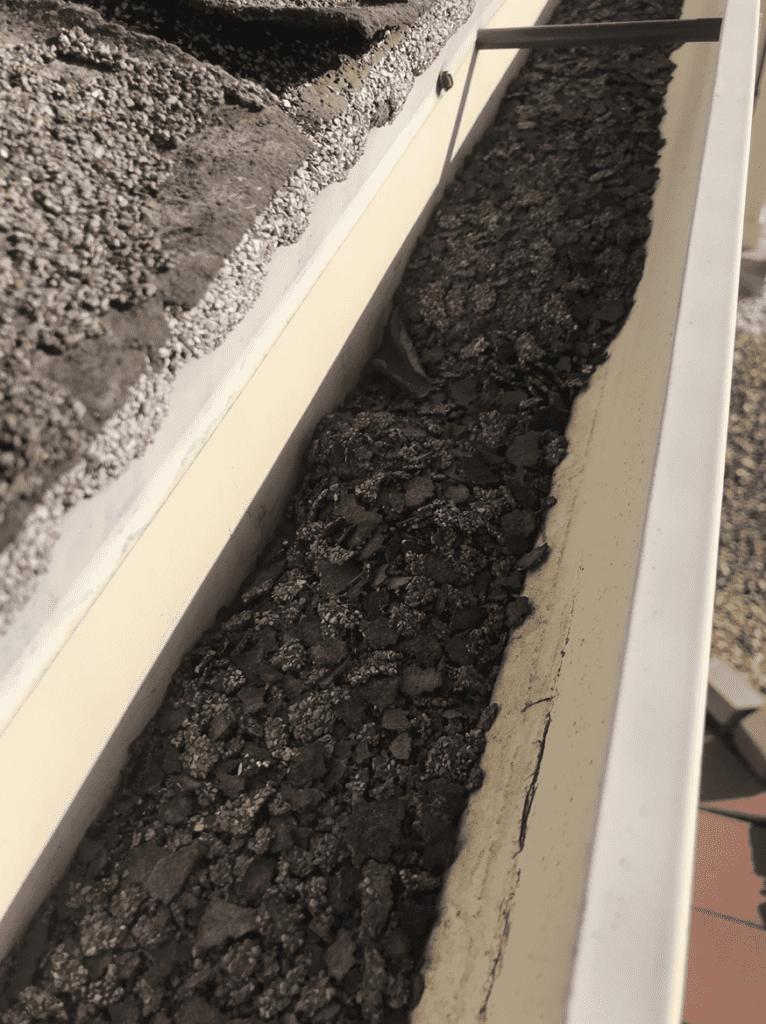
1) CLOGGED/BLOCKED GUTTERS – When gutters are catching the rain and snow as it comes off your roof, that means it is also catching EVERYTHING else that has fallen up on the roof. And it will ALL end-up in the gutters. Organic matter such as leaves, pine needles, twigs, branches, aggregate and dirt coming off your roof, or even blowing trash can build up over time or even just a season if you don’t keep them clear and clean. And rotting organic material can form a thick sludge that will clog gutters and have them overflowing quickly if there is no maintenance performed on them. You can put on a “gutter guard” that will keep most of the leaves and twigs from ending up in the gutters. And honestly, you have to be careful with “gutter guards” because when winter rolls around, gutter guards can possibly lead to ice damming and icicles forming and falling off the gutters, which can be a hazard. So, if you have gutter guards put on, be careful and be aware.

Gutters are in need of a good cleaning!

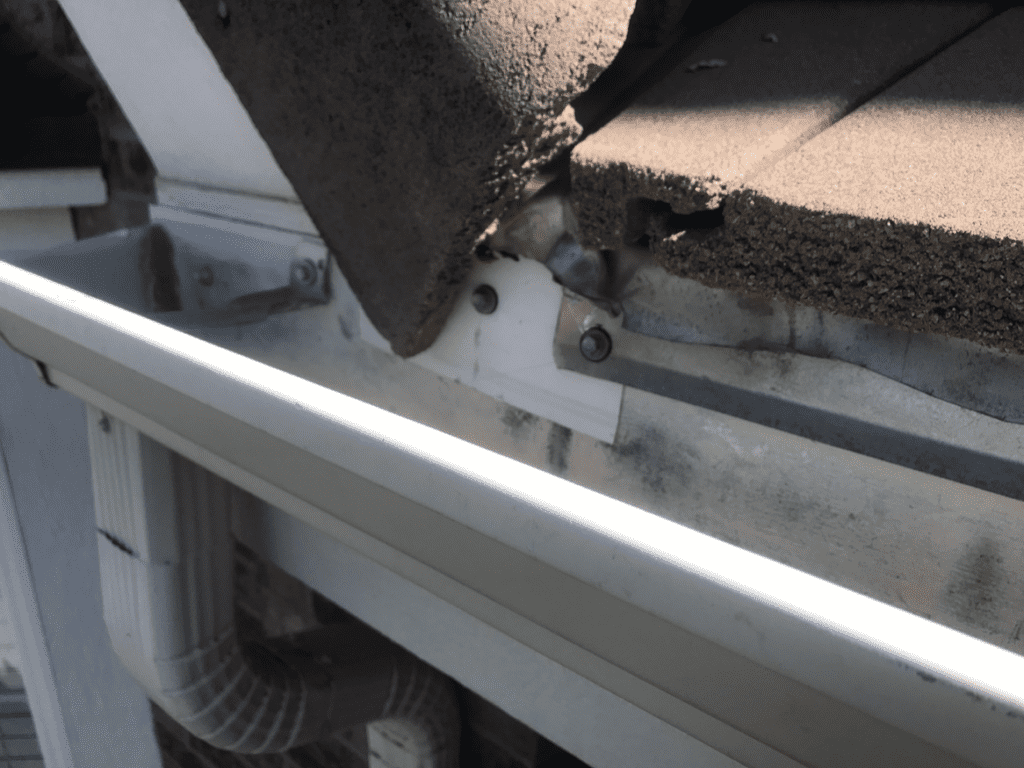
2) GUTTER/DOWNSPOUT LEAKS – When gutters are installed, the installer may have missed sealing a joint or a downspout hole with what we call “gutter cement.” It’s meant to seal the gutters so that you don’t have any leaks. Leaking can get behind the fascia and soffits and cause additional damage if not corrected.

3) BACK-FLOWS – Clogged gutters can also lead to overflowing or “back-flowing” gutters which can pour over the edge and defeat the purpose of having gutters. And in the winter months, those leaks can also lead to ice on the pavement which can be a huge hazard. Full gutters from clogs or having them hung improperly can also lead to ice forming in the gutters when it’s cold. That ice can expand and cause issues like pushing the gutters away from the fascia. Ice damming can form up under the shingles and cause damaging leaks. Also, convergence points of where corners meet and the system gets complicated can also be a point of issues. Have a professional look at them.

There is a lot going on in this picture of a gutter we recently looked at.

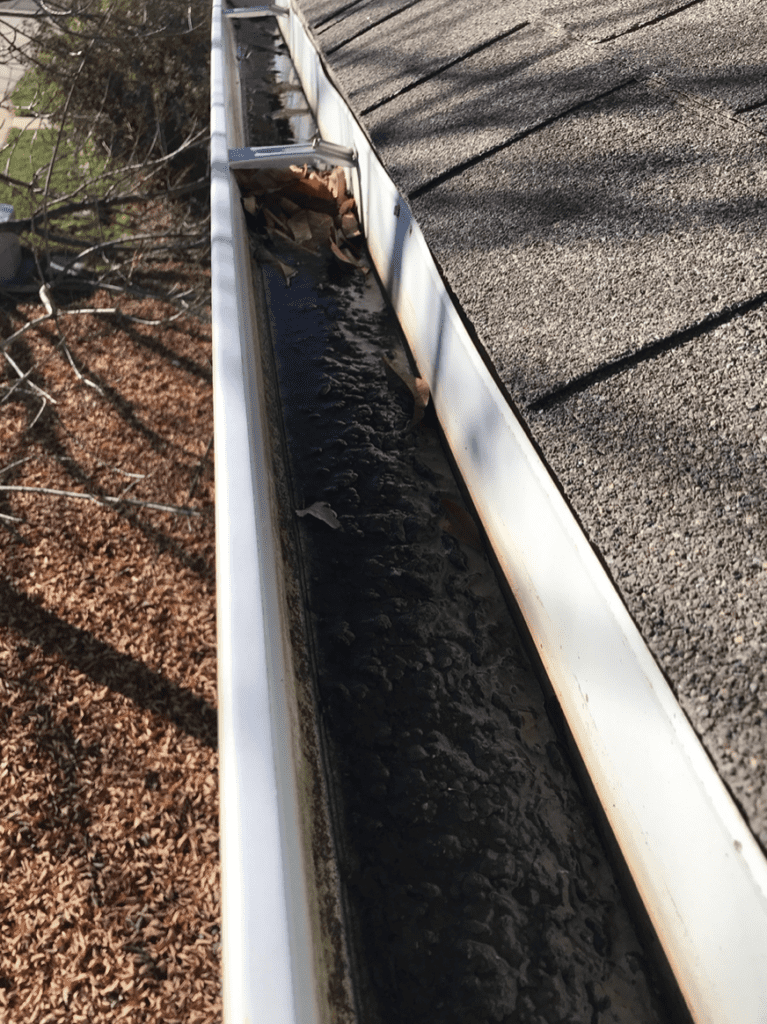
4) POORLY SLOPED GUTTERS – When gutters are installed correctly, they should have a slight slope towards the downspout drains so that when it rains, they drain properly and don’t have standing water in them after a precipitation event. If they are not sloped correctly, water will pool and when mixed with leaves, dirt and normal granule loss from your shingles, it can eventually create a blocked gutter. Not to mention that during a storm, they will not be draining properly. And standing water can pool and damage gutters over time. I’m not sure that most people realize that their gutters have a slight slope. I’ve had clients tell me that their gutters are crooked. If you are not aware of how they are hung, If you go to the front of your home, and look at them you should be able to see it. If they are not sloped, or sloped properly it will become a problem over time.

5) SAGGING GUTTERS – Gutters have traditionally been attached to your fascia and trussing beams by long and large nails that were hammered into the end of the trussing beams. Now gutters are attached with “hangers” that are placed along the gutter and screwed into the fascia to hold the weight of the gutter and the contents during a weather event. When its wintertime, and a tremendous amount of snow and water that fills your gutters, maybe there is an abundance of organic material and granule clogged in the gutters or they were not installed with enough hangers, the extra weight can cause them to sag and they can even buckle. The weight just overwhelms the existing hangers and they can fail.

The perfect example of neglected and “sagging” gutters.

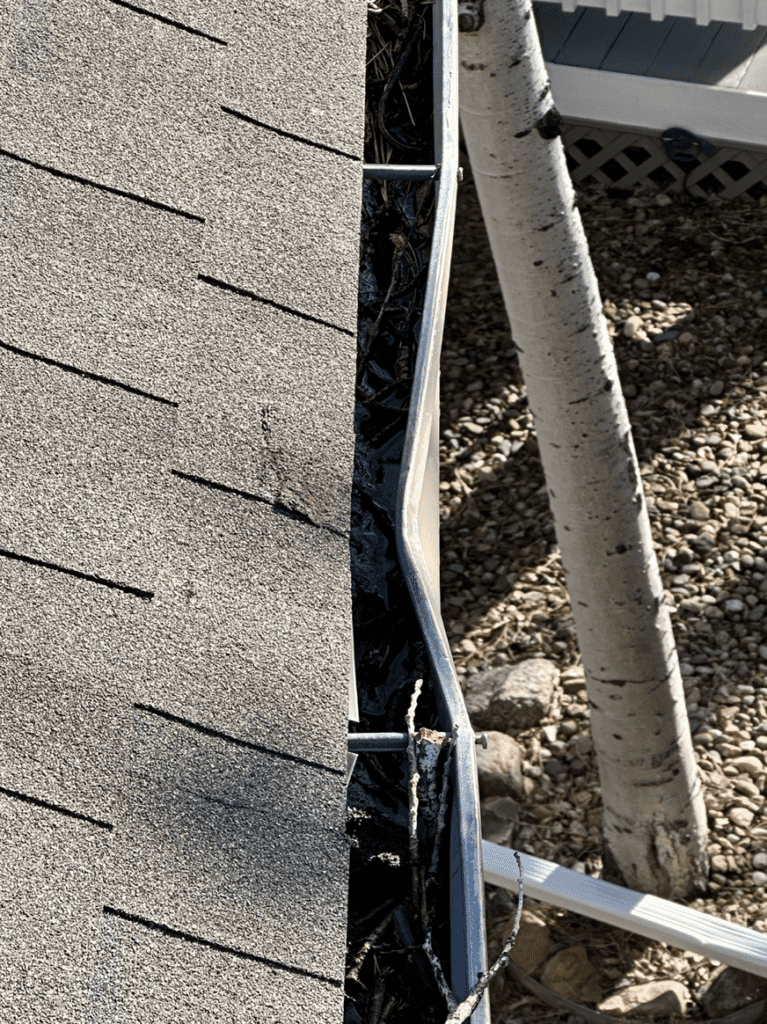
6) DAMAGED GUTTERS – Gutters can be damaged for a number of reasons. They can be dented, become cracked, bent out of their original shape, they can be sagging, clogged or blocked and most likely have the seams fail and leak. Even seamless gutters have a few seams. They are limited, but they are there. All of these can cause water to pool or organic material to clog and create extra weight in the gutters. Eventually, when a ladder gets placed against them to get up on that section of your roof, they can come off their hangers and even collapse. Hopefully you as the homeowner or a professional is doing the necessary maintenance so that this does not occur. Gutters falling off your home can bring a whole slew of additional issues that you just don’t need.

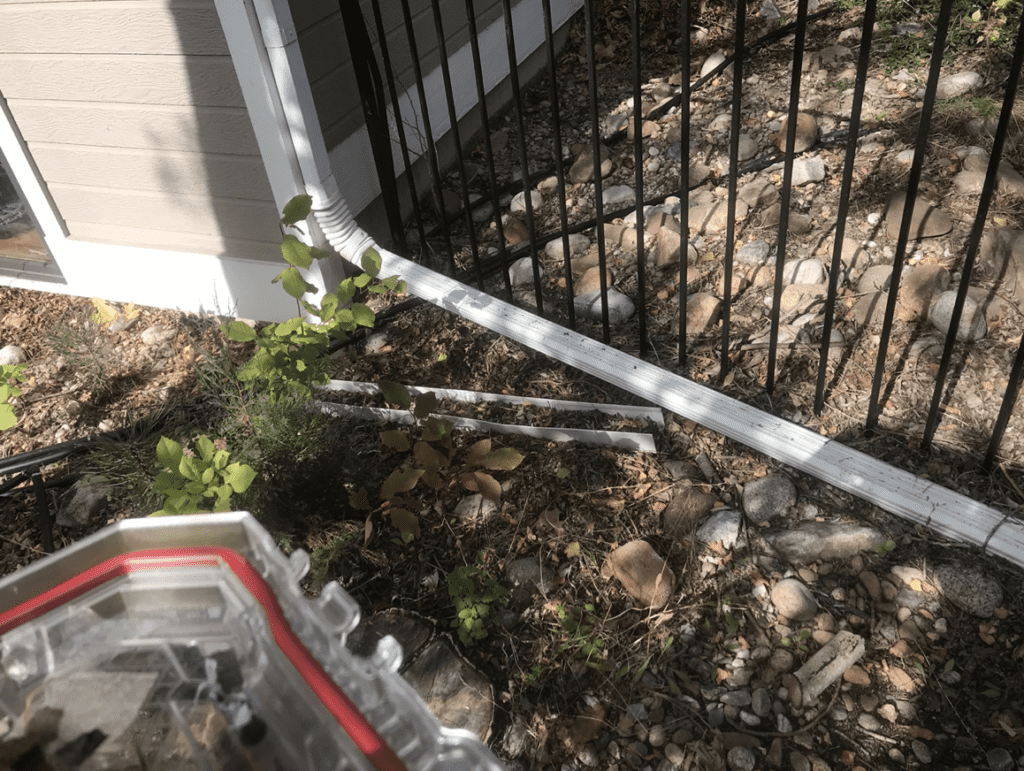
7) IMPROPERLY BUILT DOWNSPOUTS – If your downspouts are built correctly, everything should be fine. There should be enough drainage around the house from the gutters and drainage should not be an issue. Sometimes downspouts need to be placed in areas where the water should be aimed at a drain when emptying on concrete or should be channeled away from the foundation of a house with an extension or “kick-out.” Downspouts can also be missing the sealant or “gutter cement” that seals around the opening at the gutter. If you are having issues with them leaking or getting clogged, have a professional look at them.

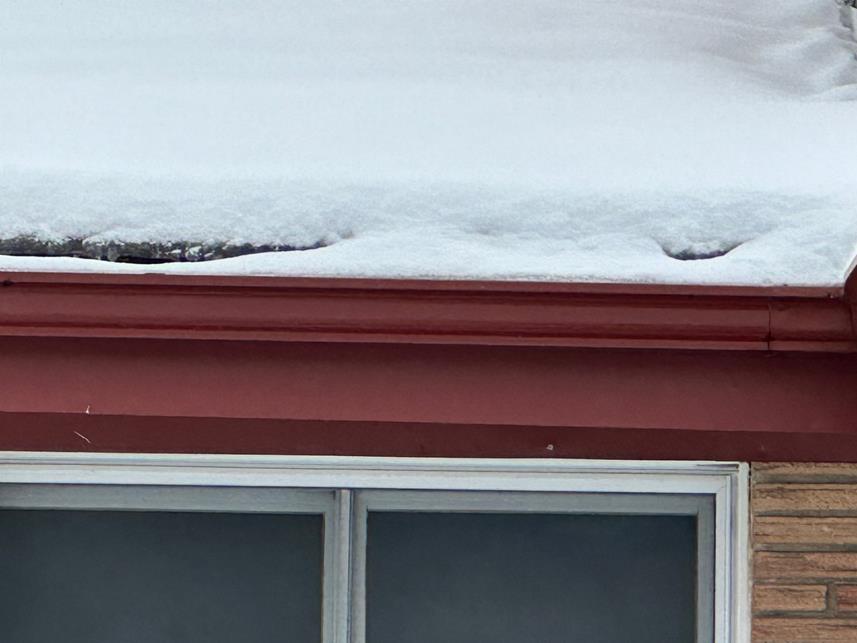
8) ICE DAMMING – When there is too much snow on top of your roof, and warm and cold days and nights, your gutters can be overwhelmed with ice damming. The snow will thaw and freeze and thaw and freeze. It will start to create hanging ice cycles and freezing up on the roof, especially at the gutter line. This can be an issue if not addressed. The ice/snow can form and push up under shingles even pulling nails up and working moisture up under the underlayment on the roof, which can cause an internal leak. Most of the time, “heat cable” placed in the gutters or zig-zagged near the eve of the roof can prevent this kind of build-up of ice. But not always. Sometimes it requires manual effort to pull the snow off the edge of the roof with a snow rake to lessen the snow load. This can be dangerous, so if you are not comfortable on a ladder, get a professional to help.

9) INCORRECT SIZED GUTTERS or DOWNSPOUTS – 5” seamless gutters and 2” by 3” downspouts are the norm when it comes to the standard size. Depending on the size of the roof and the amount of water coming off each slope, you may need to upgrade to 6” gutters and 3” by 4” downspouts. Larger roofs with multiple combining of slopes can create too much water trying to drain out of too little drainage and cause problems.

10) TOO LITTLE DRAINAGE FROM DOWNSPOUTS – Gutters are installed on the eves of the home. (The edge of the roof at the end of a slope.) Where downspouts are placed can be a challenge in certain situations because of needing to drain away from walkways, basement window wells, home foundations and more. Sometimes gutter systems are designed with too little drainage to handle the amount of rain. Here on the Front Range, we seldom see that kind of precipitation, and it can, and does occur. So, most systems are designed and built for the norm. The lack of adequate drainage can cause water to get behind the gutters and cause issues with leaks inside the home along with long term issues with fascia and soffits if they are not addressed. Call out a professional to help come up with the proper solution to inadequate drainage.

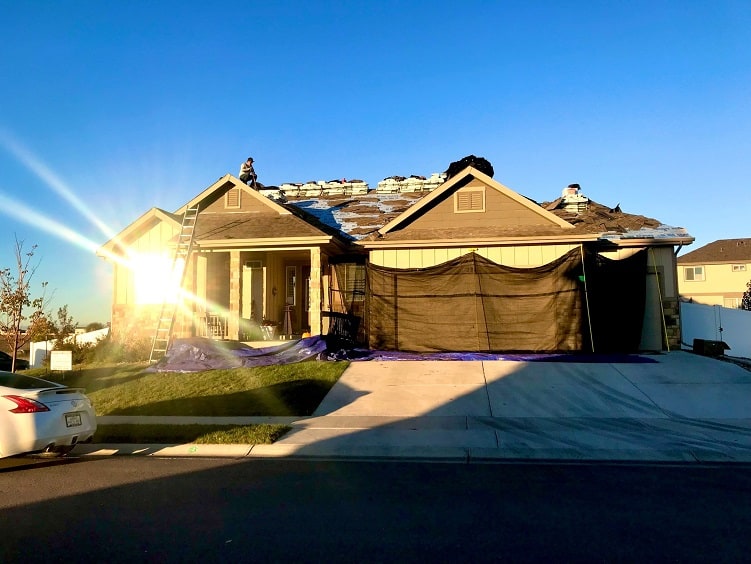
11) OLD GUTTERS – Here on the Front Range, with regular hail storms, gutters are most likely replaced from time to time but sometimes they can just age and outlast their lifespan and need to be replaced before they cause a bigger issue. We do see gutters just needing to be replaced for the reasons listed in this article above.

Older damaged gutters from a fallen tree branch.

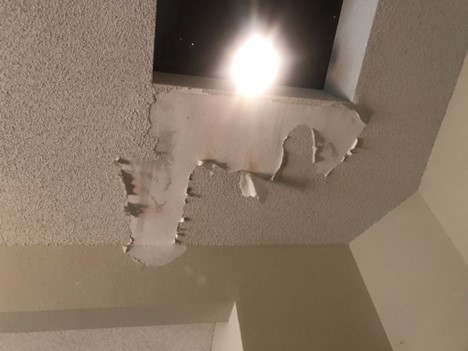
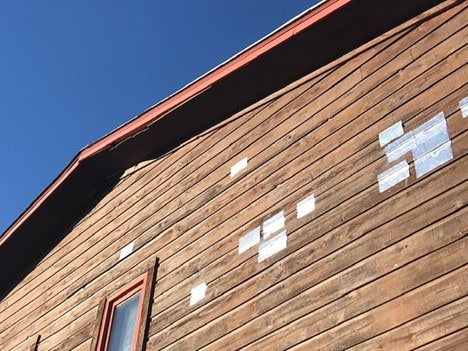
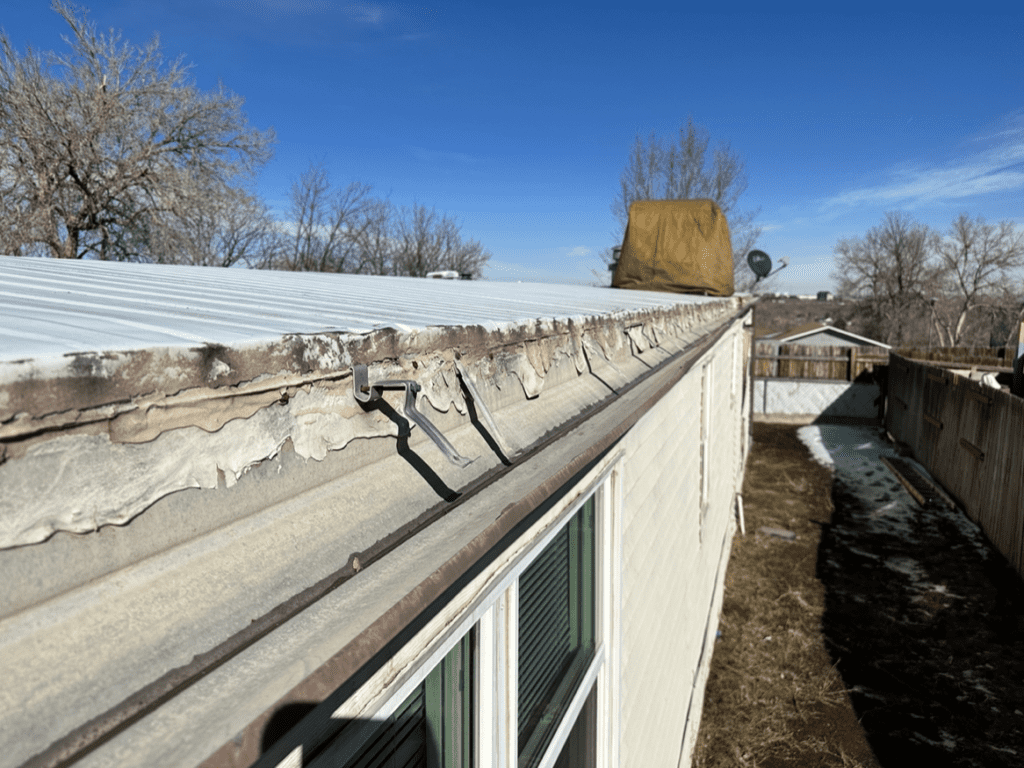
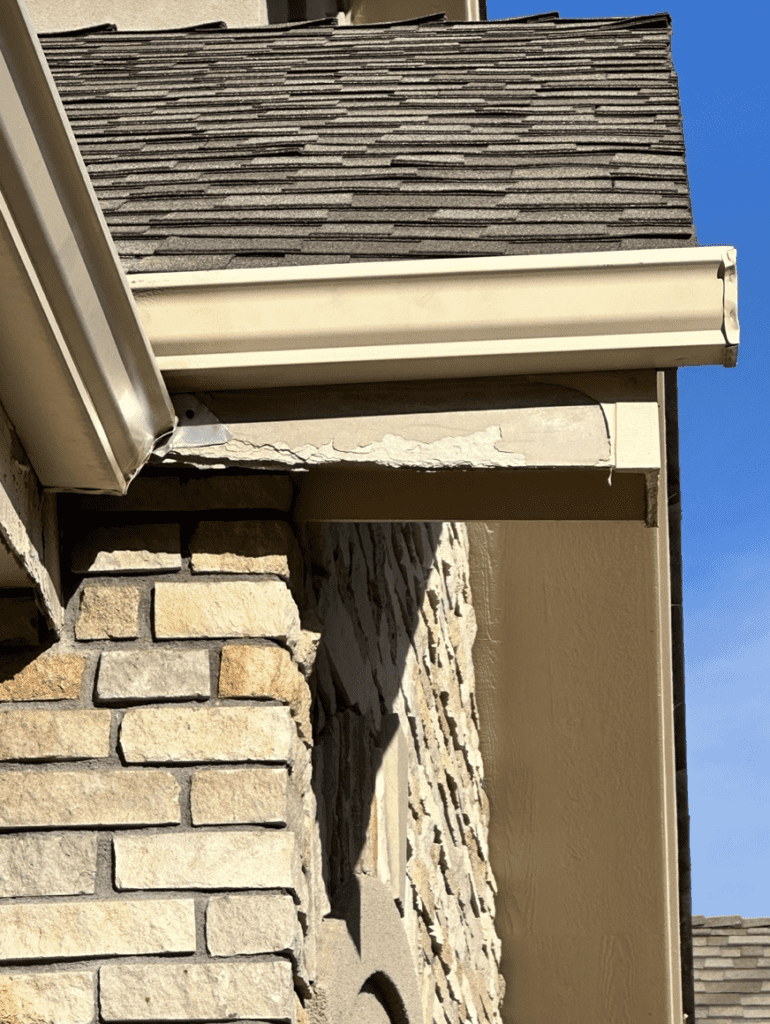
12) ROTTING FASCIA or SOFFITS MEANS… – When you see a rotting section of your Fascia or Soffit or you see the paint peeling on sections of them, you have water that is leaking or overflowing out of your gutters. This is a sign to deal with the issue immediately before it worsens.

Extreme water damage on fascia and soffits from poorly installed gutters.

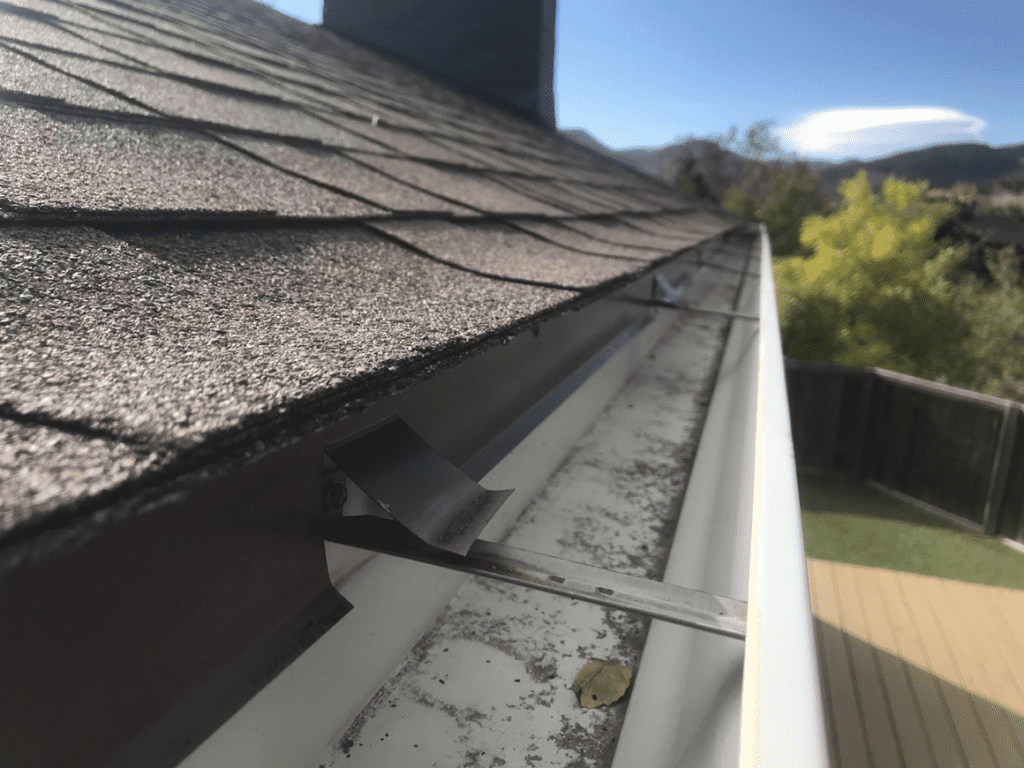
13) CHANNELING WATER FLOW ON THE ROOF – Sometimes a piece of special “flashing” is needed to properly channel waterflow in and on certain sections of your roof. The roofers attempt to take care of this during the roof installation. And certain flashing is code. And depending on the design of the roof, more might be needed. This usually can only be recognized during a storm and extreme situation to show need. If you see water pouring out of your gutters at a corner or over the edge of the gutter, take video during the event and show it to a professional.

With ANY leak or overflow situation, take pictures and preferably video to show your local Roofing/Gutter professional the actual situation that you are calling them about. It would be very helpful at pinpointing the proper solution and speed up the repair process.

Let us know if we can be of any help in supporting you in fixing your situation.

Top Things to Consider When Thinking About Installing a Skylight

If you’re considering installing a skylight, it’s essential to understand the important connection between skylights and your roof to protect your home from potential problems.

Many homeowners worry that installing a skylight will cause leaks in their roof, but the “all skylights leak” is a actually a myth. The leading cause of leaking skylights is poor installation, leak barrier errors or improper methods used during construction. If you install a skylight incorrectly, it won’t be properly sealed against weather. Poor quality materials can also contribute to problems down the road and a leaking skylight or roof is inevitable.

The best way to ensure that your skylight won’t leak is to install it correctly by a roofing professional experienced with the installation process like Denny’s Roofing. Choosing quality materials, such as the right waterproofing membranes and flashings, is also vital to protecting the roofing system.

Installing a skylight can be a great way to bring natural light into your home and create a beautiful aesthetic. However, installing a skylight also involves working on the roof, and that’s why it’s critical to consider the following things before installing one: 

1. Determine the Right Placement

When installing a skylight, think about the direction of sunlight you want. 

South-facing skylights bring in the most direct sunlight and are best if you’re looking to maximize natural lighting. East-facing skylights get morning sun and are the brightest during winter when days are shorter. West-facing skylights are great for bringing in the afternoon sunlight and can be used to enjoy the sunset or watch a beautiful sky during the night. North-facing skylights bring in diffused, indirect light throughout the day, which is best for preventing overheating from direct sunlight. When you’re thinking about the room in which you want to add a skylight, clarify your goals for lighting will help you determine the best placement.

2. Consider Your Existing Roofing Materials 

When installing a skylight, it’s essential to consider how it will affect your roof. 

Skylights are an opening in the roof and should be installed carefully by a professional roofing company to ensure that waterproofing isn’t compromised. Check with your local professional before installing a skylight to ensure it won’t compromise the integrity of your existing roof or cause any other potential damage in the form of future leaks. This is really not a do-it-yourself type of project. Adding extra insulation or ventilation may also be necessary to prevent heat loss.

If your roof is aging and nearing the end of its lifespan, installing a skylight may not be the best idea, as it can cause additional stress to the already weakened roofing system. It will also add weight to your roof, so make sure that it can support the extra weight before installing one. These steps can help protect your home from future damage and ensure the skylight gets installed correctly. When installing a skylight, use quality materials designed to withstand extreme temperatures, wind, snow, ice and of course rain!

3. Prevent Heat Gain by Installing Vents or Shutters

When installing a skylight, prioritize improving air circulation and reducing heat gain.

Installing a skylight is a great way to bring in natural light and ventilation while adding character and beauty to your home. However, installing a skylight can also increase the amount of heat gain into the home through your roofing materials. To help prevent this, installing vents or shutters or even solar shades near the skylight can improve air circulation and reduce heat gain. 

This is especially beneficial during summer when temperatures can be high outside. That said, it’s crucial to ensure that installing vents or shutters near a skylight doesn’t damage your roofing material. So, it’s wise to consult a professional company for advice on protecting your roof before installing it. Installing vents or shutters near a skylight allows you to enjoy the benefits of natural light and air circulation without sacrificing energy efficiency!

4. Hire a Professional with Experiencing Installing Skylights

When installing a skylight, hiring a professional roofer often makes the most sense!

Denny’s Roofing is a certified Velux Instalation Specialist and listed on their website. 

It’s best to get help from a professional roofer or contractor when installing a skylight, as they will have the right tools and knowledge to install it, ensuring to seal any potential leaks or drafts properly. Not all roofers have extensive experience installing skylights, so ask questions before hiring them such as how many skylights they’ve installed in the past, what type of skylights they’re used to installing, and whether or not they can provide references from customers who have installed skylights with them in the past.

It’s also vital to ensure the roofer is familiar with installing skylights on various roof types and materials, such as metal and tile. This will help protect your roof from any potential damage during the skylight installation process. The difference in the installation of all three is a very different process for each.  

Lastly, ask your roofer what steps they will take to ensure the skylight is installed correctly and safely. A professional roofer should be able to answer all of these questions and provide guidance on protecting your roof before installing a skylight.

If you’re considering installing a skylight on your roof, you’ll need to understand the process. We don’t recommend this being a do-it-yourself project. Too many things can go wrong. But if you are set on doing it yourself… Here is the process.

Several methods exist for installing skylights on roofs, including direct nail-down and shingle-over. Direct nail-down involves attaching the skylight directly to your roof with nails, while shingle over requires installing a flashing and asphalt base prior to installing the skylight. 

Whether you go with direct nail-down or shingle over, be sure to carefully follow the manufacturer’s installation instructions for your particular product.

Let’s look at the process for installing a skylight:

  1. Installing a skylight begins by accurately measuring the area on your roof where you plan to install the skylight. This is a crucial step as it will help you determine the type of skylight that’s best for your space and ensure that it fits properly. You’ll need a tape measure, a carpenter’s level, and a chalk line to measure the area accurately. Begin by measuring the opening length in which you plan to install the skylight, making sure to measure from corner to corner so that you accurately measure both the width and length of the opening. Next, use your carpenter’s level or a regular leveler to see if your roof is square or not. You may need to adjust your measurements slightly if it’s not. Once you have the sizes and know that your roof is square, use a chalk line to mark around the perimeter of the opening. This will give you a general idea of where to install the skylight once it arrives.
  2. The next step is to ensure that the framing and flashing meet local building codes before installing them. Before installing a skylight, you need to know what type of skylights are allowed in your area, what materials are allowed for the skylight frame and flashing, and how to properly install them. Your local building codes will provide specific information about these requirements. You can find the local codes at your city or county website under building codes or a licensed contractor specializing in installing skylights and roofing. When installing the skylight, follow the manufacturer’s instructions and adhere to any additional building code requirements in your area. This will help ensure that it’s correctly installed, sealing out water and protecting your roof from future damage. By doing your research ahead of time and making sure all framing and flashing meet local building codes, installing a skylight can be an easy and rewarding experience. With the proper knowledge and diligence, installing a skylight doesn’t have to be intimidating or overwhelming.
  3. After that, cut an opening in the roof deck for the skylight frame and flashings, making sure to protect your roof with a cover or tarp during this process. Strengthen the area around the opening by installing a reinforcing plate of galvanized steel, or plywood. This will help support the skylight opening and protect the roof deck from potential damage. Cut out the marked area using an oscillating saw, jigsaw, or circular saw with a fine-toothed blade. Choosing the right type of saw for the job is important – if you use a saw with too coarse of teeth, it could damage your roof deck. Then, install flashing around the opening and attach it securely to the deck with nails or screws.
  4. Once you cut the opening and the framework is correctly mounted, it’s time to install the skylight. With direct nail-down, you’ll simply attach the skylight directly onto your roof with nails. If installing shingle-over, you’ll need to lay a base of asphalt underalyment that is tied into the existing roof system properly and install the proper flashing before installing the actual skylight. Most skylights have the appropriate flashing kits available when you purchase the skylight.
  5. Be sure to follow up with some silicone sealant or caulk for extra protection! Once your skylight is installed you must take measures to ensure that it remains properly sealed. This includes installing additional flashing around the edges of your skylight and using sealant to fill any gaps or holes.

What are the most common types of skylights?

Skylights come in various styles, shapes, and sizes. 

The three most popular types of skylights are fixed skylights, operable skylights (often referred to as ventilating skylights), and tubular skylights also referred to as “sun tunnels.”  Fixed skylights are non-opening windows that provide natural light and a great view. Operable skylights open to provide ventilation and can also be used to bring in natural light. Tubular skylights are compact, dome-shaped skylights that fit between roof rafters and provide bright, efficient lighting in hard to reach places like in the middle of the house.

Skylights and roofing materials should be considered together to ensure they complement each other in style and function! Additionally, look for skylights with energy-efficient features such as double glazing and low-emissivity (Low-E) coating.

Considering these factors, you can choose the perfect skylight for your room or home improvement project. With the right combination of style and construction, installing a skylight can be an attractive and efficient way to bring natural light into your home.

Homeowners should also be aware that installing a skylight requires specific knowledge and expertise. If you’re not familiar with roofing techniques and guidelines, or are not a confident do-it-yourselfer, it’s best to hire a professional to do the work for you

If you already have skylights installed on your roof, you’ll want to consider how often they need to be replaced to ensure your roof (and your home) stays safe!

But how can you tell when a skylight needs replacing? 

First, inspect your skylights for any visible signs of damage, such as cracks in the glass or worn-out frames. If you notice any wear and tear, it may be time to consider installing a new skylight. You’ll also want to pay attention to any leaks that may occur during the rainier and snowier months. Leaks can be a sign of a compromised seal, so addressing these issues is important before they cause more damage. 

In addition to inspecting for visible signs of damage, another way to see if your skylight needs replacing is by installing a safe ladder and stepping onto your roof to physically inspect the skylight. If you find that your skylight is cracked or damaged, installing a new one will not only protect your roof from future damage but can also help improve your home’s energy efficiency. If you don’t feel comfortable getting up on your roof, hire a professional to do the inspection.

Finally, it’s important not to neglect regular maintenance of your skylight! 

This includes regularly checking for any signs of wear and tear, such as cracks or leaks. And looking at the area just under the skylight to see if there are any moisture stains or cracks in the wood or sheetrock that need to be addressed. Regularly maintaining your skylight will ensure it lasts longer and keeps your roof safe from further damage. 

Ultimately, installing and properly maintaining a skylight can benefit your home in the long run. 

It’s essential to regularly inspect your skylights for any visible signs of damage or wear and tear, and installing a compatible skylight on your roof can help protect it from further deterioration. With proper maintenance, you’ll ensure that your skylight keeps your home secure and energy-efficient for years to come! 

Is Replacing Your Roof Before Selling Your House Worth It?

When you’re preparing to sell your home, there are plenty of decisions to make. One of the most important is whether or not you should replace your roof before listing it on the market.

It can be tempting to put off a major repair like replacing your roof until after you’ve sold your house. After all, it’s expensive and time-consuming. But if you want to get the best possible price for your property, it’s often worth investing in a roof replacement before you list.

If you haven’t had your roof inspected lately, now’s the time to do so whether you’re getting ready to list or just exploring your options for selling in the near future.

A roof inspection can tell you if your roof is in good condition or if it needs to be replaced. Its wise to get a roofer of your choice to look at it before the buyers home inspector looks at it so you know what shape the roof is in. If the inspector finds any major problems, such as structural damage to flashing missing shingles, or hail damage, you’ll need to have them fixed or replace the roof before putting your home on the market.

Here are some reasons why it’s worth investing in a roof replacement if its needed before selling your home:

  • Replacing a roof can help you avoid any hassles during the sale process. Buyers who are interested in your home will likely get an inspection of their own, and if they find a damaged roof, it may give them an opportunity to renegotiate the price of your house or even walk away from the deal altogether. A roof in good condition gives potential buyers peace of mind and reassurance that they won’t need to worry about any costly repairs or replacements once they have purchased the property.
  • Investing in a roof replacement before selling is also financially sound, as it increases the value of your home. This makes your home more desirable to buyers, and can lead to a higher sale price in the end. Overall, replacing or repairing your roof before selling your home is an excellent way to ensure that you move through the process without any hassles, and with the best chance of getting the most value for your property. Especially if its a high quality Class 4 Impact Resistant shingle. A lot of insurance companies will give a 25% discount when you have a Class 4 IR shingle installed. It’s a great selling point. Talk to your Realtor about it if you are interested.
  • A new roof can help attract more buyers and make your house stand out from the competition. Buyers are often willing to pay more for a home with a brand new roof that won’t need any repairs or replacements in the near future.

How much will a roof replacement cost?

Deciding whether to replace your roof before selling your home can be a difficult decision. There are several factors to consider when making this decision, including the cost of the replacement, the potential benefits of replacing the roof, and how long you plan on staying in your home.

Cost is obviously an important factor to take into account when deciding whether to replace your roof. The cost of a roof replacement will depend on the size of your home, materials used, and local labor rates. Additionally, if repairs are needed before the full replacement can be done, then that may add to the overall cost as well.

The benefits of replacing your roof before selling should also be weighed against the cost. As shared above, replacing your roof can lead to a higher sale price for your home, as buyers will be more likely to purchase a home with a newly installed roof. Additionally, replacing your roof may help reduce energy costs in the long run, as newer roofs are often much more energy efficient than older ones, which will be attractive to potential buyers.

Lastly, you should consider how long you plan on living in your home before selling to decide whether to replace the roof. If you’re planning on staying in your home for a while, then replacing your roof may be worth the cost and effort. On the other hand, if you are only planning on selling soon, then it might make more sense to do repairs instead of a full replacement unless there would be enough damage that a potential buyer won’t want your home because of the roof.

When there is a lot of homes for sale on the local market, or its what is referred to as a buyers market, the buyer can be pickier about the repairs needed and do. We do inspections and pre-sale certifications all the time. Be prepared in advance.

Replacing your roof before selling your home can give you peace of mind knowing that your property is in top condition and ready for sale.

All things considered, replacing your roof before selling your home can be a smart decision.

But ultimately, it’s up to you to decide if the benefits outweigh the costs. If you choose to replace your roof, make sure to hire a reputable local contractor like Denny’s Roofing who can give you a written estimate and provide references for previous roof replacement projects.

Once your roof is in good condition, you’ll be able to list your home with confidence knowing that you’ve done everything you can to ensure the best possible sale price and a smooth sale. Good luck!

Give Your Roof the Protection It Deserves: Essential Steps for Avoiding Roof Leaks

As a homeowner, one of your main responsibilities is to take steps to prevent roof leaks. Without regular maintenance and preventative measures, your roof can start leaking as it ages, and that can lead to costly repairs or even replacement. Fortunately, there are several simple steps you can take to prevent roof leaks from occurring in the first place!

Understanding Roof Leaks

Before we dive into preventative measures, it’s important to understand how roof leaks happen.

Typically, roof leaks occur when water seeps in through damaged shingles or flashing – the metal strips that prevent water from entering at the edges of a roof and around vents, chimneys, and other protrusions. When these protective barriers fail, water can penetrate the roof and cause extensive damage.

In some cases, damaged shingles or flashing may be the result of extreme weather events, such as windstorms, hail storms, ice and even tornados. These can put enormous strain on a roof’s structure and can cause holes or ruptures that allow water to get in.

Sometimes preventative steps – such as regular maintenance and inspection – can prevent roof leaks from happening in the first place. Making sure that your roof is free of debris, that shingles and flashing are intact, and that your attic has proper ventilation can all go a long way towards keeping your roof in good condition.

It’s also important to be aware of age and wear-and-tear. Over time, a roof’s materials may break down and need to be replaced in order to prevent water damage. If you’re unsure of the age or condition of your roof, it’s best to contact a professional roofing contractor for advice and professional opinion.

Signs That Your Roof May Be Leaking

One of the best ways to prevent roof leaks is to be on the lookout for signs that your roof may be leaking. Here are a few things to look out for:

  • Discoloration or staining on interior walls or ceilings
  • Mold, mildew, and odor in the attic
  • Blistering paint on the exterior wall
  • Peeling wallpaper
  • Water spots or water trails inside the home
  • Puddling or dripping during of after a storm

If you notice any of these signs or suspected roof damage, contact a professional roofer to inspect your roof and take the necessary steps to prevent further damage.

Essential Steps for Preventing Roof Leaks

Taking preventative steps to protect your roof is a must, and here are a few of the best ways you can prevent leaks on your own:

Make sure all shingles are in good condition and that no loose or cracked shingles are present.

As a homeowner, checking the condition of your roof shingles is essential to ensuring the safety and structural integrity of your home. Although you may not want to climb up on your own roof, checking for loose or cracked shingles regularly is an important part of maintaining your roof’s health.

Here are some steps you can take to inspect your roof shingles and identify any that may need to be replaced:

  1. Examine the area near the chimney, vents, and edges of your roof for any cracked or missing shingles. These areas are especially exposed to the elements, so checking them often is important.
  2. Look at the valleys of your roof, checking for any cracked or loose shingles. Valleys are the intersections where two roof surfaces meet, and if they’re compromised your home may be at risk of water or ice damage.
  3. Examine the nails used to secure each shingle in place. Look for any that have pulled away from their original position, as this could be an indication that the shingle has been damaged. High winds can and do pull up loose shingles. They can also cause what are called “nail-pops” where the head of the nail protrudes up under the shingle and it pokes through the shingle causing a hole and possible water intrusion point.
  4. Take a look at your roof from the ground using binoculars or a telescope. This is an easy way to spot any missing or cracked shingles without actually getting on the roof.

These steps should help you identify any potential problems with your roof shingles. If you have any concerns about the condition of your roof, it’s always best to contact a professional for an inspection. They can help you make sure that your home is safe and secure.

Inspect for any missing nails or metal flashing.

Inspect the nails used to secure shingles and inspect for exposed nail heads or any missing nails. Look for any signs of rust on the metal flashing, which could indicate corrosion. Check that all nails are properly sealed with silicone, mastic or a proper sealant to prevent water from entering the roof decking through the nail holes. Inspect your roof’s joints and seams for any gaps or separations. Pay special attention to the areas around vents and exhausts, as these are common spots for water intrusion.

To inspect for missing nails or metal flashing:

  1. Start at the edge of your roof and work your way up in a zig-zag pattern.
  2. As you inspect, look for any loose shingles or gaps between shingles that could indicate missing nails.
  3. Check for any visible nail heads and inspect the metal flashing to look for any signs of rust, corrosion or damage.
  4. Look in the corners of where the different roof slopes meet. There can be specialized flashing at these points that can come loose and cause issues if it pulls away from its original location.

If you notice any issues, such as missing nails or metal flashing, contact a roofing professional to inspect the roof and make any necessary repairs. This will help ensure your roof remains in optimal condition and can help prevent costly water damage.

Regularly clear the roof and gutters of debris and leaves, which can cause water pooling.

Clearing your roof of debris, such as leaves and twigs, and even bird droppings is important to keeping it in top condition. In addition to being an eyesore, debris collecting on your roof can lead to water pooling which can cause problems for your home’s structure over time.

Water pooling occurs when the rain or melting snow has nowhere to go because of the debris on your roof. This can create long-term water damage as the water collects and pools, potentially leading to issues such as rot, mold, and other structural damage. Bird droppings are acidic and can eat into the shingle if left over time.

Fortunately, clearing your roof of debris is relatively simple if done correctly.

Here are a few steps you can take to ensure that your roof is free from any debris and water pooling:

  1. Inspect your roof regularly for any signs of debris accumulation. This should be done at least once or twice a year, but more frequently if you live in an area with frequent storms or your home is surrounded by trees.
  2. Remove any visible debris by using a leaf blower, rake or broom to clear it away. Be sure to wear protective gear, such as gloves and a dust mask, if needed.
  3. A lot of people Install gutter guards or leaf-catching systems on your gutters. These can help prevent leaves and other debris from clogging your gutters and causing water pooling on your roof. And they are also prone to ice damming in the winter and can cause large icicles to form on the gutters also with ice dams that can damage the roof. To be honest, we don’t recommend them.
  4. Have a professional regularly inspect your roof for any signs of water pooling or other damage.

By taking these steps, you can help keep your roof clear of debris and protect it from water pooling. If you ever spot any signs of water pooling or damaged shingles on your roof, contact a professional immediately to address the issue before it worsens. Taking care of your roof now can save you a lot of time and money in the long run.

Replace any damaged gutters and downspouts that prevent water from entering your home.

Replacing damaged gutters and downspouts is a necessary step for homeowners to take in order to prevent water from entering their home through the roof. It’s important for homeowners to understand the process of replacing damaged gutters and downspouts, as well as the steps needed to complete this task.

The industry norm for gutters is “seamless gutters” which are rolled out and created on site so that there are no seams to leak other than the corner joints. This is done by a professional. The gutters that you would pick up at a home improvement store are not sufficient to use on any property that you value. They just don’t hold up very well.

Here are the steps that we go through for new gutters:

  1. First, we measure the length of your gutter or downspout and purchase the appropriate materials needed to replace the damaged area. There are choices of the thickness of the metal and also the actual size of the gutters. The common size is a 5” gutter. They also have 6” gutters if the roof is large and needs more flow to handle a lot of water coming off your roof.
  2. The gutters are then mounted properly with “gutter hangers” to the fascia of the home.
  3. We also make sure that the gutters are angled properly so that they will drain appropriately. You may see them slightly sloping toward the downspout to ensure proper drainage.
  4. We also put an adhesive sealant to ensure that the joints and end caps will be securely fastened in place and be without leaks.
  5. We then use snips and drills to put the holes in them for the downspouts so that they are accurately placed.
  6. Finally, we make sure all of your connections from the gutters to the downspouts are sealed and fastened properly in order to prevent water leakage.

Replacing damaged gutters and downspouts may seem like a daunting task, but with the right knowledge and materials, it is an easy process that can save homeowners from costly repairs in the future.

Check for signs of discoloration or staining on the exterior of your roof.

One of the key steps a homeowner should take to ensure their roof is in good condition and preventing roof leaks is to look for signs of discoloration or staining on the exterior. Knowing what to look out for can help you identify any potential problems before they become too serious.

The process of checking for signs of discoloration or staining is fairly straightforward:

  1. The first step is to determine where you should check. You should focus on areas around the roof that are exposed to direct sunlight and places where water could collect, such as the valleys between shingles or the area near the eaves and gutters.
  2. After determining the locations of your inspection, then you can begin to look for signs of discoloration or staining. These signs can appear as dark spots, streaks, patches, and/or fading on the roof’s exterior surface.
  3. If your roof has any of these signs, then you should contact a professional roofer to assess the damage and make any necessary repairs.

At the end of the day, checking for signs of discoloration or staining on your roof is an essential part of keeping it in good condition. By following these steps and inspecting your roof regularly, you can ensure that any problems are identified quickly and taken care of promptly before they become too serious. This will help keep your home safe, secure, and properly protected from outside elements.

When it comes to preventing and repairing roof leaks, hiring a professional roofing company is always the best choice.

With their expertise and experience, they can identify any potential problems before they become bigger issues. Furthermore, they have the right tools and materials to ensure that the repair is done properly and within safety regulations. This ensures that your home remains protected from the elements and keeps your roof functioning optimally.

Another benefit of hiring a professional roofing company is that they can help you save money in the long run. By preventing or repairing minor roof leaks, you can avoid costly repairs down the line. This not only saves you money but also prevents future damage to your home and property.

Additionally, a professional roofing company can provide advice on preventing future problems and help you maintain your current roof in top shape.

Your roof is an integral part of your home, so it’s essential to take preventative measures to prevent roof leaks from occurring. By following the steps above and being vigilant about regular maintenance, you can prevent roof leaks and protect your home from costly repairs in the future.

If you do find signs of a leak, contact a professional roofer as soon as possible to prevent further damage. And remember, prevention is key – so make sure you take the steps outlined above to prevent roof leaks for good!

Can Roofing Work Be Done During Colder months?

In short, yes! You can certainly do roofing work during the colder months of the year.

The main concern with installing a new roof or doing repairs on an existing one is the damage that cold temperatures, snow, and ice can cause to roofing materials if they’re not properly protected. While it’s possible to do roofing work during colder times of year, it’s important to take a few extra precautions in order to ensure the job is done properly and safely.

It’s also important to be aware of the type of materials being used in roof repairs or replacements and their suitability for winter and early spring weather conditions. For example, some asphalt shingle varieties are not suitable for cold temperatures and wet conditions and won’t bond properly when exposed to ice and snow because of the adhesive on the back of the shingle. Certain shingles are not designed to be installed in temperatures that are below 50 degrees. Your roofing contractor should know the perfect shingle for colder weather.

If you have an urgent roof repair or replacement, then colder months may be a viable option depending on your climate and weather conditions. However, if you’re just looking for standard roof maintenance or minor repairs, then spring is usually the best time to do roofing work.

Should I repair or replace my roof in the colder months?

Cold weather can be difficult on your roof, and it’s important to make sure you take proper care of it. If you’re thinking about repairing or replacing your roof in the colder months, here are some reasons why that can be beneficial:

  • There’s storm damage to your roof. If shingles are missing or there’s extensive water damage from ice daming, then it’s certainly worthwhile to get the repairs done as soon as possible. Cold and winter weather can cause more harm if roof damage is left unattended in the form of interior leaking.
  • You don’t want to worry about late spring and summer storms interfering with your roof repair or replacement job. If you’ve ever tried to undertake a roofing project during the summer months, you know how important it is to have favorable weather conditions in order for the job to be completed on time and correctly. During winter months here on the Colorado Front Range, there tends to be fewer disruptions from storms and other inclement weather that can potentially delay your project. It’s not usual for there to be weeks when the temp is in the 50’s and even 60’s for stretches that is ideal for roofing.
  • You may be able to catch potential problems before they become more serious and require further repairs in the future. Since winter and early spring offer fewer opportunities for bad weather to interfere, it’s a great time to take advantage of dry days and check your roof for any signs of damage or wear-and-tear that need to be addressed. People forget how a little roof maintenance can go a long way.
  • Winter roof repair and replacement may be less expensive than during other times of the year. Since winter is a slower season for roofers, you may find that it’s easier to get an appointment or better pricing on services. Additionally, if you take care of any repairs or replacements now, you can avoid more costly problems down the road.

Cold months can be a tough time of year for roofs.

The cold weather, high winds, heavy snow, and ice can take their toll on roofing materials, leading to damage such as leaks, cracks, or even collapse in mountain regions where the snow is deep. As a homeowner, it’s important to keep an eye out for signs that your roof may need repairs or replacement during the colder months.

Some common signs that your roof may need repairs or replacement include:

  • Cracked, curled, or loose shingles
  • Missing flashing around chimneys and vents
  • Ice dams in the gutters
  • Sagging roofs and ridges
  • Leaking gutters
  • Leaking skylights
  • Water spots on walls near the roof
  • Interior leaks or stains

If you notice any of these issues, it’s important to contact a roof repair or replacement specialist as soon as possible! Here at Denny’s Roofing we are here to help.

In addition, if your roof is more than 20 years old, or you’ve experienced extensive damage due to storms, you may want to consider replacing your roof. New roofs offer increased protection from the elements and can significantly improve your home’s energy efficiency too.

If you think your roof may need repairs or replacement, never hesitate to call a professional for assistance. A qualified roofing contractor can inspect the condition of your roof and provide you with solutions that fit both your budget and needs. By taking these steps, you’ll be able to protect your home and family from potential winter damage.

There are many good reasons to consider repairing or replacing your roof in the colder months, and it’s important to keep up with regular maintenance no matter what season it is. If you have any questions about roof repair or replacement during winter, be sure to contact us today!

Picking the RIGHT Commercial Roofing Contractor for your HOA or Apartment Complex

A storm sweeps through your neighborhood and there is obvious damage to your HOA community. You and your neighbors have damage to the exterior of your buildings. The storm was strong enough to cause damage to your roof, gutters, skylights, siding, windows, painting, or even more on your HOA complex. You sit on the board of your small HOA or are an advisor that represents your apartment or condo community and everyone is wondering what to do now. Including you.

Where do you start?

“If it is hail or extreme wind damage, call a ROOFING CONTRACTOR because that will be the largest of the trades that will need to get repaired.”

Well, below are some suggestions on what to do to put things back in order.

The first thing that you should do is call a professional contractor to come out and take a look at the entire property and get them to assess the damage BEFORE calling your Insurance company. If it is hail or extreme wind damage, call a ROOFING CONTRACTOR because that will be the largest of the trades that will need to get repaired. Any good Roofing Contractor that does residential and commercial projects will handle all of the additional exterior issues too. If they don’t handle the other trades, and you would have to vet a series of sub-contractors… don’t use that Roofer. They are most likely not a Contractor. Jobbing all that out yourself will be a tremendous amount of effort and if you are sitting on the HOA board, or repair committee and not getting paid, trust us when we say, get someone that will be your Contractor and handle all the details.

If you have a known Contractor that has done work for you in the past, and you have been satisfied with them, you should be in good shape. You have worked with them in the past, you have a track record, and you have a level of trust in them. They took great care of you and did excellent work. You already know who to call. Perfect.

 If you have not already vetted a Roofing Contractor, and a storm hits, or you are not sure about the Roofer that you have used or are interested in looking for a NEW Roofing professional — keep reading.

There are several things that you can do to make sure they are going to be a good fit for your HOA.

First, ask for a referral from someone you know in the building industry if you have one.  Ask how they know them… and if they have ever worked directly with them before.

If you don’t have a good referral source, you can go online and look for a Roofer that is also a G.C. (General Contractor) and can handle ALL of the different trades that need to be completed for your job. Or at least the vast majority of them. This will save you and the HOA board a lot of busy work down the line.

Next, look for a Roofing Contractor that has an impeccable reputation online with at least 30 to 50 more excellent reviews. They don’t have to be 5-star reviews. As much as you try to make everyone happy, you can’t please everyone all the time. And if they have a few 3 or 4-star reviews, look at their response to the “less than perfect reviews” and see if they offered to make whatever happened – right. Did they work hard to please the client or right the wrong? Especially on the 1-star review. Did they apologize and take responsibility for the situation? Did they explain themselves?  Or did they make an excuse and reply to the review in a “snarky” or even worse, an angry tone?  In construction, sometimes things happen that are out of the Project Manager’s control, and it can be hard to make everyone happy.  But how they respond to adversity and criticism goes a long way. Look for a big “red flag” around how they deal with adversity.  Contractors are professional problem solvers and should have lots of patience on all fronts.

Next, look at their website to see if they have a strong presence with a website that has some actual information on it that has value. A site that they feel represents them and their company’s personality. If their words on the page are generic and none specific, they most likely will be too.

You will most likely have a “meh” experience. They will lack the passion to make sure that their jobs are done right. Their website is the front-facing representation of their company. If they are not giving offering up knowledge or pictures of work that they have done, they might not be a good fit. Remember, anyone can say they do a good job and schmooze you enough to get you to sign a contract and get you locked in.  Trust your gut on this aspect.

Ask for references that you can call and check in on their previous work.  They should be able to give you a list of people willing to sing their praises.  There is a big difference between someone doing a satisfactory or adequate job, and a company that creates excited fans.  You will be in charge of spending a LOT of money on your project.  You want someone that will make you look like a hero at the end of the work.

This is about this for a second – “companies are people wrapped in a logo.”  Ask specifically who you will be your “point of contact” and have them earn your business. It’s ok for them to jump through a few hoops to earn your trust. Meet with them a few times. Above all, pick someone that you like working with, who is a good communicator and seems to have decent values and a work ethic.  I know that sounds obvious, but you would be surprised. You will be spending a lot of time over the next few months working hand-in-hand with your contractor.  They should be responsive and professional and even-keeled and ON TIME. Someone that does what they say they are going to do when they say they are going to do it. They are professional problem solvers.

All contractors must be licensed and insured. A license means that he has the proper licensing to work on your type of property (HOA, Commercial Buildings, Apartment Complexes, Flat Roofing, Multi-Family Residential, etc.) Once you see that they have the GC license for your local, make sure that the contractor is adequately insured. It’s not out of line to ask for up-to-date paperwork.  That should not be an issue to get you. It is important that you know exactly what their insurance coverage is. You need to understand if they will cover damages to your property and any other employee liability onsite during the work. You should also ask what is the coverage for the sub-contractors and their employees. When it’s time the contractor will get a building permit to ensure that the work is being done to code with the city or locale where the work is taking place.

Next, once you have picked a few new companies to call, you know what to ask to vet them and you can also learn a lot about them and the company when they come out and take a look at the damage.

Once your Roofer gets there to assess the damage, let them walk the property, either on their own or with you, and then let them explain what THEY see that needs attention on your building, and what they think needs to be done to fix it. You will get a chance to see just how observant they are. And if you are still in the vetting process of choosing them as your Contractor, you WANT them to be extremely observant and thorough and explain things to you. It’s important to have someone that sees more than you do, so that things get done right.  They are the expert.  You should be able to depend on their expertise without you having to be the one reminding them.

Ask lots of questions to qualify your Contractor:

  • Tell me about the repair/replacement process with your company.
  • What is your overall production process? What is your system?
  • If you use subcontractors, tell me about them.
  • Do they have any possible timeline issues to complete the work?
  • What types of materials/brands do you suggest that I can look into?
  • What should I expect around communications with you? Who/How/Why/details?
  • What warranties come with the repair/replacement of the materials and labor?

Don’t be shy.

Once they are done and have given you their field assessment, you can also ask the Contractor to explain what you can expect as the next step once you make your decision on who you are going to work with. Don’t let them push you into signing a contract immediately.  A good one never will.

He might say that they are able to repair things or if there is enough hail damage, they might tell you that the roof needs to be replaced and what is involved in calling the Insurance company, to file for a claim and bringing an Adjuster out and a little about the process from that point on.

By this point, if you have vetted several companies, you should have enough information to make an informed decision on who you want to hire.

Once you decide on a Contractor, and let them know, then you can call in a claim and have your chosen Contractor meet with your Insurance Adjuster so that they can help represent your best interest from start to finish.  The Insurance process of a claim is pretty standard as to how the process goes. And the only thing that the HOA will be responsible for will be deductible on the policy.

Once you get your estimate from the Insurance company, also called a “scope of work,” the process begins.

If you follow these suggestions on the front end, the actual work itself should happen fairly effortlessly because you will have done a lot of the hard work on the front end of the process.  You are now in good hands with a seasoned professional and the foundation of a successful job has been set.

If we can help, or you have any questions about our process, or you need a second opinion, do not hesitate to call our Longmont CO office to speak to one of our experts that can help guide you through this process all up and down the Front Range and close mountain towns. 

My Commercial Roof needs to be replaced. Should I use TPO or EPDM on a flat roof?

I have a flat, commercial roof on my building in Longmont CO. It needs to be replaced.  Do I ask for an EPDM or a TPO roof?  What is the main difference?

You have 2 main different types of roofing material for a flat roof on a commercial or even residential building – TPO (Thermoplastic Polyolefin) single-ply membrane roof system or an EPDM (Ethylene Propylene Diene Monomer) synthetic rubber roofing membrane.

Honestly, there is no easy answer as to which material is better.  They both are durable and cost-effective options for a metal roof, which can be much more expensive. And they both have some good and not as good factors to consider.

There are several other membrane roofing systems that can be used on a flat roof in certain situations, but in this article, we are going to focus on the pros and cons of just TPO vs EPDM.

Let’s take a look.

First, if you have a flat roof on a commercial or residential building, and you are not quite sure if you have an EPDM or a TPO roof system, you can quickly look for a few items on the roof to figure it out. As a general rule of thumb – if your roof is black, it’s most likely an EPDM material.  White would most likely be TPO. Next, look at the “sheen” of the material.  EPDM has more of a matte finish vs a shiny surface for TPO.  You can also tell by actually touching it.  Since EPDM is made of rubber, think of a tire innertube, it’s a little bouncy to the touch whereas TPO is harder and can have a mesh in its layers for strength and is made from plastic.  Lastly, look at the seams. TPO will have seams that are mechanically welded whereas EPDM will have fewer seams because it comes in wider rolls and the seams are glued and taped by hand.

Let’s start our comparison by saying that under the EPDM or TPO systems, the substructure of the single-ply material is almost identical in how it is built out. So, it really comes down to the choice of surface material.

Here are several overarching factors that you may want to consider when you are deciding which material to use:

  1. Down to basics: as a roofing membrane – TPO is made from plastic, and EPDM is made from rubber.
  2. Color choice: EPDM is commonly sold only in Black. Other colors can be specially ordered. TPO is primarily white and can be found in grey, tan, and a few additional colors.
  3. Local climate: TPO is a better choice in hotter climate ranges because it reflects the harsh sunlight. EPDM is usually black and holds it heat better during colder temperatures.
  4. Height of the Building: TPO weighs less than EPDM so it has an advantage of a taller building. TPO also has “welded” seams, so it tends to do a bit better with high winds. EPDM is a slightly better choice for roofs close to the ground and is slightly less expensive.
  5. Cost: TPO is slightly more expensive to install and repair than EPDM because of the labor factor.

TPO vs. EPDM

Comparing 2 types of Single-Ply Roofing Membrane 

TPO – has been in the marketplace for approx. 20+ years / EPDM has been used for over 60 years. In the US, TPO’s popularity is building and about 50% of all commercial roofs are now made from TPO.

TPO is Chemically Adhered along with a hot air “welding” of the seams. Requires electricity to do it. Having the availability of electricity can be an issue in some situations. EPDM is Mechanically adhered with adhesive. Rolled on with anchors and seam tape. Manual Installation and requires no electricity.

TPO reflects Sunlight so it’s more energy efficient in the summer and hotter climates whereas EPDM retains heat from sunlight. A better choice for cost efficiency for winter and a number of different climates.

TPO is slightly more expensive than EPDM because of the equipment it takes to “weld” the seams on TPO.  The welded seams tend to last longer in extreme weather and high winds.

TPO is about 3x more resistant to punctures than EPDM which potentially means fewer leaks with proper maintenance.  But EPDM lasts longer and is slightly more resistant to weathering and has a 60-year track record.

TPO typically has a manufacturer warranty of 15 to 20 years vs EPDM on average lasts 20 to 25 years. You can get up to a 30-year manufacturer warranty with certain thickness membranes with EPDM. This is climate dependent.

EPDM can be found in wider rolls than TPO. So that you can potentially have fewer “seams” with an EPDM roof system.

Also, both TPO and EPDM are manufactured by a number of different companies.  Quality is not always consistent from company to company. Ask your contractor about their opinion on the quality of the material to get the most longevity possible out of your new roof.  They are going to have to stand by the manufactures warranty.  They will know.

In conclusion, looking at this list of pros and cons for each of the two materials may help you decide what might work best for you based on your needs.

Be sure to consult with your roofing contractor too.  Since the pandemic, in some areas of the country, commercial roofing materials have been in short supply and certain materials and accessories can be tough to find. Some supply companies are still not getting their regular quotas for their orders met yet.  So, your choice might be limited to the availability of materials.

As always, do regular inspections and any necessary maintenance and repairs right away to ensure the longevity of your roof so it lasts as long as possible.

If you need help making the right choice on replacing your flat roof here on the Colorado Front Range.  Give us a call!  We would love to come out and take a look at your roof and help you come up with a plan that is right for you.

We have years of experience in Commercial and Residential Roofing and we would love to share our expertise with you.

colorado roofs experience all sorts of weather related damage

Top 5 Roof Damage Issues in Longmont Colorado

Roof damage is a common issue in Longmont, Colorado, due to the large hailstorms that frequently occur in the area. The Colorado Front Range is called “Hail Alley”. In this article, we will discuss the top 5 roof damage issues in Longmont and how to prevent or repair them.

hail causes serious damage to shingles and roofs

Hail damage: Hailstones can range in size from pea-sized to tennis ball-sized, and they can cause significant damage to a roof. Hailstones can dent or crack shingles, causing them to become less effective at protecting your home from water damage. If you suspect that your roof has been damaged by hail, it is important to have it inspected by a professional as soon as possible. To prevent hail damage, consider installing a “Class-4 Impact Resistant” shingle when it’s time to replace your next roof. A little extra cost goes a LONG way in protecting your roof and it can get you a significant discount on your homeowner insurance with your Insurance carrier.

high winds cause shingle damage and water ingress

Wind damage: High winds can cause shingles to become loose, fold over, or can be completely torn off of a roof. This can lead to water infiltration and damage to the interior of your home. To prevent wind damage, make sure that your roof is properly secured and that your shingles are in good condition. If you notice any loose or missing shingles, have them repaired or replaced as soon as possible. Taking care of the outside of your roof will go a long way in protecting the inside of your house. The newer shingles that have been developed over the last 10 to 15 years withstand MUCH higher wind velocities than older 3-Tab or T-lock shingles. T-lock shingles are no longer manufactured.  So, if you have them on your roof and have any damage whatsoever Insurance will most likely have to replace your roof. The newer shingles also require 5 to 6 nails on each shingle rather than 4 like the older shingles for the updated wind ratings too.

water damage on a roof leads to serious repairs if unnoticed

Water damage: Water infiltration can occur when a roof is not properly sealed or when it is damaged. Water damage can lead to the growth of mold and mildew, which can be harmful to your health and the structure of your home. You might not think of mold and mildew on the Front Range because of how dry it tends to be but once the moisture gets into your attic, it can grow over time. To prevent water damage, make sure that your roof is properly sealed with a regular roof inspection and maintenance every 3 to 5 years. That way, any damage can get repaired as soon as it is discovered.

Snow melting and refreezing preventing water from draining

Ice dams: Ice dams occur when snow on the roof melts and then refreezes at the edge of the roof. This can create a dam that prevents water from properly draining off of the roof and gutters. This has been a very common occurrence this Winter. The snow will freeze and get up under the shingle and push back up under the shingle and work its way past the underlayment. This can lead to water infiltration and damage to the interior of your home. To prevent ice dams, make sure that your roof is properly insulated and that your gutters are clear of debris before wintertime comes around.  Get a long “snow rake” to pull snow off the lower areas of the house where ice build-up happens if you have a one-story home.  If you know that Ice Dams are a regular issue, you can also install “heat tape” along the eve of the roof and in your gutters to help it from showing up.

Squirrels, birds, and raccoons can damage a roof by digging or scratching at the shingles.

Animal damage: Animals such as squirrels, birds, and raccoons can cause damage to a roof by digging or scratching at the shingles. We see this type of damage all the time during inspections. The animals are trying to get out of the extreme weather. They burrow into any area that is not properly sealed. Even the smallest of open areas on your roof can invite a “critter” to make a nest. This can create openings that allow water to infiltrate the roof and damage the interior of your home. It can also lead to having animals in your attic and up in the roofing structure which can become a major issue. To prevent animal damage, consider installing protective wire barriers on vulnerable areas of your roof, under solar panels, and trimming back any branches that are near the roof. You can also have our roofer secure certain areas of penetration and add extra caulk to points that might seem inviting for animals to enter.  Below is a picture of a home where we did some repairs on the soffit and fascia. The metal plates were the homeowner’s attempt at covering the holes in the siding that a woodpecker kept coming back to over and over again.  You can see at the top of the picture where the birds got into the soffits by pulling them back to have just enough of a hole to sneak in and get out of the extreme weather.

In conclusion, the top 5 roof damage issues in Longmont, Colorado are hail damage, wind damage, water damage, ice dams, and animal damage. To prevent or repair these issues, it is important to have a professional inspect your roof regularly and address any damage as soon as it is discovered. By taking these precautions, you can protect your home and ensure that it stays in good condition for years to come.

dealing with hail damage to a roof ending up in a re-roofing

The Top Roofing Systems Ideal in Colorado to Resist Hail Damage

When it comes to protecting your home from the large hailstones that are common on the Front Range of Colorado, the type of roof you have can make a big difference. In this article, we will discuss the top types of roofing materials that are ideal for resisting hail damage, as well as the advantages, and cost comparison of each roof type.

Metal roofing: Metal roofing is one of the most durable roofing options available and is resistant to most hail damage depending on the thickness of the metal. It’s also good for heavy snowfall areas too. Metal roofing is available in a variety of styles and colors and can last for decades with proper maintenance and the appropriate underlayment. Additionally, metal roofing is fire-resistant and also energy-efficient, which can lower your cooling and heating costs. They tend to be more expensive than other options, but can last for 30-50 years and can increase a home’s value when you go to sell. It’s very popular along the Front Range and in the Mountains.

Concrete and Clay Tile Roofing: Concrete and clay tile roofing are also highly resistant to hail damage and can last upwards of 50 years with proper maintenance. Some clay tile roofs in Europe have last 100’s of years. They are fire-resistant, energy-efficient, and offer a high level of durability and weather resistance. These are also more expensive than traditional asphalt shingles but can last a lot longer, look great and increase home value.  NOTE: As durable as concrete tiles are to weather, a number of Insurance Companies do not recognize a lot of different Tile manufacturers for a Class 4 – Impact Resistant premium discount.  Check with your agent to see if your manufacturer is on the list.

Composite/Fiberglass shingles: There are a number of new Composite options for a roofing material that are coming onto the market every year.  We are not early adopters of them because we feel like they need to be battle-tested with our weather on the Front Range. Fiberglass shingles are a more affordable option than a Metal Roof or even a Tile Roof. There are a number of different types. They are also resistant to hail damage and lighter material and can last for up to 20+ years with proper maintenance. They are also fire-resistant. They come in a variety of colors and styles, but they may not last as long as the other options. And because they are thinner and lighter than are not really great in colder climates because they provide a little less insulation and can crack in the colder temperatures.

Architectural Asphalt Shingles: Class 4 – Impact-resistant shingles: Impact-resistant shingles are a popular choice for homes in the Front Range area, as they are specially designed to resist hail damage. These shingles are constructed from a combination of asphalt and a rubber polymer and are rated to withstand hailstones of up to 2 inches in diameter. These shingles are more affordable than Metal or Concrete Tile roofs. And a little more than a traditional Asphalt Shingle. When installed correctly they can last up to 20 or 25 years with proper maintenance. They come in many colors, are Fire Resistant, and are an upgrade to a traditional shingle.  A Class 4 IR Shingle can also get you up to a 25% Discount on your Homeowners Insurance with some carriers.  We at Denny’s Roofing like it so much that we put a Class 4 IR Shingle on almost every new roof we put on. The cost vs value of this product is spectacular.  Ask us more when we come out to take a look at your roof.

In conclusion, when it comes to resisting hail damage in the Front Range area of Colorado, metal, concrete, and clay tile, composite shingle, fiberglass shingles, and asphalt class-4 impact-resistant shingles are among the best options. Each of these roofing types has its own advantages and cost considerations. While metal, concrete, and clay tile roofing may be more expensive, they have a longer lifespan and can increase the value of your home. Impact-resistant shingles may be more affordable and still offers good resistance to hail damage. Ultimately, the best option for your home will depend on your specific needs, budget, and preferences. It is always recommended to speak with a professional roofing contractor to find out what is the best choice for your home. Give us a call to discuss the options!

a complete re-roof after a hailstorm

Why It’s Important to Have Your Roof Thoroughly Inspected After a Hailstorm in Colorado

Living in the Front Range area of Colorado, residents are no strangers to the powerful hailstorms that can occur in the region. After a hailstorm, it is crucial to have your roof thoroughly inspected, as hail damage can be difficult to spot and may not be immediately obvious if you are not sure what you are looking for. In this article, we will discuss why it is important to have your roof inspected by a professional roofer after a hailstorm in the Front Range area.

Preventing water infiltration: Even small dents or cracks in your shingles caused by even small hailstones can weaken their ability to protect your home from water infiltration. This can lead to leaks, mold growth, and significant damage to the interior of your home. A professional inspection of your roof will identify any damage that may have occurred and help to prevent water infiltration.

Identifying hidden damage: Oftentimes, hail damage is not visible from the ground, or the homeowner may not have noticed it. A professional inspection of your roof will be able to identify damage that is not immediately obvious, such as damage to the underlayment or structural elements. This will ensure that any damage is addressed before it becomes more severe. Also, if you see your neighbors getting their roofs inspected or even replaced, there is a good chance that you have some damage too.  Unless you have a new roofing system that is designed to resist hail damage.  They exist now.

Protecting your investment: A roof is a significant investment for any homeowner. By having your roof professionally inspected and maintained after a hailstorm, you can ensure that it remains in good condition and protects your home for many years to come. This can also help to maintain the value of your home if you decide to sell it in the future.

Insurance: Many insurance policies have a time limit for homeowners to file hail damage claims, as well as need a professional inspection of the roof. Getting your roof inspected by a professional after a hailstorm can help you to identify damage that is covered by your insurance policy and submit a claim before the deadline.

Preventing further damage: A roof that is damaged by hailstorms is more susceptible to damage from other weather events such as wind. By having your roof inspected and any damage repaired, you can prevent further damage from occurring and ensure that your roof remains in good condition.

In conclusion, it is essential to have your roof inspected after a hailstorm if you live in the Front Range area of Colorado. Not only will this help to prevent water infiltration and identify hidden damage, but it will also protect your investment, help with insurance claims, and prevent further damage. Regular roof inspections are an important part of maintaining the integrity of your home, and in the Front Range, it’s especially important after any hail storm.